Quilting tutorials are always fun to watch. I always wonder if I could make a quilt, and how long it would take? As a beginner quilter, it's kinda hard not to see or hear of the Missouri Star Quilting Company. Jenny Doan started long-arm quilting in 2008, and since then has dominated the World Wide Web, YouTube Channels, and even has her own Factory Store! Pretty impressive. As soon as I downloaded the MSQC app on my iPhone, it has opened new doors for me, as well as other quilters! She has the best video tutorials that are super easy to follow, comprehend, and execute. I have made a couple other quilts in the past, but this one is different. This one...is going to be ALL MINE! Bwhahaha!
Instead of a doing a tutorial (which you can find here) I wanted to share with you the fabric, design and overall excitement of this sashed half-hexagon quilt. Here is what you need to get started!

I love the look of this quilt. It is a perfect mix between a friendship braid and half-hexi twist. Sew cool! It even looks like a stained glass window. Jenny, of MSQC chose a black sashing inbetween her hexagons and I think it really makes this pattern POP. However, the best part about quilting is you can make any quilt YOURS! Same pattern, but different fabrics, colors, border, sashing, etc..That is what makes quilting fun. 😀
What you will need before you start:
10" Fabric Squares (Layer Cake) - I am using Retro Floral by Michael Miller. I'm really diggin' the red and turquoise colors, very vintage chic!
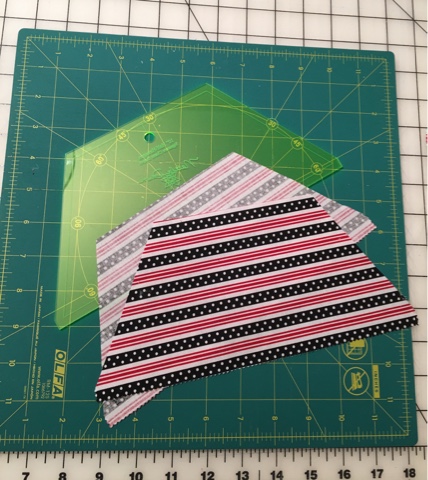
10" Half-Hexi Template for cutting.
1.5" Sashing (any color) - I am using white sashing.
Rotating Rotary Mat is crucial when cutting those Layer Cakes.
Let's start by cutting all of the 10" squares into Half-Hexagons! To do sew, fold the layer cake in half, and lay your half-hexagon template with the salvage edge along the bottom. Use the half-hexagon template to cut each piece of fabric. Once these are completed, sit back and look at all the hard work you just did! Way to go! I think cutting is the hardest part - good thing we got that out of the way!


Now it is time to add the sashing to each half-hexagon. I used a roll of white, 1.5" sashing. Line the half-hexagons onto the sashing, and sew using a 1/4" seam allowance. I was able to get three half-hexagons on each piece of sashing. Make sure to leave at least an inch in between each one. When you cut the sashing, you want to have enough space for each one. Once all of the half-hexagons are sashed, it is time to press and cut.


Using the edge of the Half-Hexagon template. Line it up and cut each one. This will add a nice border to each half hexagon. Now for the fun part!

Have you ever tried to make a friendship braid? Not only in quilting, but embroidery thread bracelets too? When I was in third grade, and active in Girl Scouts® I was always making my friends friendship bracelets. We used to collect friendship bracelets, the more you hand, the more friends you had too! We were obsessed. Even back then, my friends would get jealous that I knew how to make them and they didn't? I guess that was before YouTube videos....and I had a couple older sisters that taught me everything I knew (back then). Except for pig-latin which they would use against me to talk about the boys at school. In hopes, that I wouldn't tell my parents! Haha. They looked sew cool! It has to be my all-time favorite pattern. As soon as I saw this tutorial, I already knew exactly what I wanted to make. It has been added recently and I'm thrilled about it! Thank You MSQC!
Ok, sew you want to grab six half-hexies to make one block. Make sure these six blocks are all mismatched and different colors. It makes for a more interesting quilt. Start by adding the side of a hexagon to the bottom of the other hexagon. * Watch the YouTube tutorial for a better understanding. Once you start, it becomes easier to add each one...creating this braid until you have added all six half hexagons.

Now we are going to square-up our blocks. Ewww....not very exciting. Mine were squared to 12.5 x 12.5 inch blocks. Ta Da! You will have some scraps left over, don't worry!


Eventually you will want to add an additional border, batting, and binding to this beauty. Check out my 'Recent Projects' page for updated picture when this is completed. Soon Hopefully!
Sew Pretty! Hope you enjoyed these pictures and preview of what's to come.
Thank You
LMK
No comments:
Post a Comment