Thursday, February 25, 2016

Sashed Half Hexagon Quilt


Quilting tutorials are always fun to watch. I always wonder if I could make a quilt, and how long it would take? As a beginner quilter, it's kinda hard not to see or hear of the Missouri Star Quilting Company. Jenny Doan started long-arm quilting in 2008, and since then has dominated the World Wide Web, YouTube Channels, and even has her own Factory Store! Pretty impressive. As soon as I downloaded the MSQC app on my iPhone, it has opened new doors for me, as well as other quilters! She has the best video tutorials that are super easy to follow, comprehend, and execute. I have made a couple other quilts in the past, but this one is different. This one...is going to be ALL MINE! Bwhahaha!

Instead of a doing a tutorial (which you can find here) I wanted to share with you the fabric, design and overall excitement of this sashed half-hexagon quilt. Here is what you need to get started!


I love the look of this quilt. It is a perfect mix between a friendship braid and half-hexi twist. Sew cool! It even looks like a stained glass window. Jenny, of MSQC chose a black sashing inbetween her hexagons and I think it really makes this pattern POP. However, the best part about quilting is you can make any quilt YOURS! Same pattern, but different fabrics, colors, border, sashing, etc..That is what makes quilting fun. 😀

What you will need before you start:
10" Fabric Squares (Layer Cake) - I am using Retro Floral by Michael Miller. I'm really diggin' the red and turquoise colors, very vintage chic!
10" Half-Hexi Template for cutting.
1.5" Sashing (any color) - I am using white sashing.
Rotating Rotary Mat is crucial when cutting those Layer Cakes.


Let's start by cutting all of the 10" squares into Half-Hexagons! To do sew, fold the layer cake in half, and lay your half-hexagon template with the salvage edge along the bottom. Use the half-hexagon template to cut each piece of fabric. Once these are completed, sit back and look at all the hard work you just did! Way to go! I think cutting is the hardest part - good thing we got that out of the way!

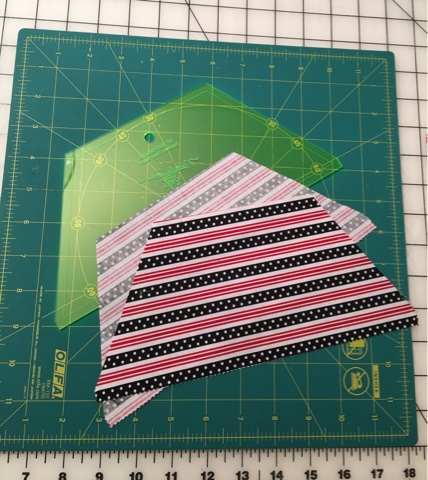


Now it is time to add the sashing to each half-hexagon. I used a roll of white, 1.5" sashing. Line the half-hexagons onto the sashing, and sew using a 1/4" seam allowance. I was able to get three half-hexagons on each piece of sashing. Make sure to leave at least an inch in between each one. When you cut the sashing, you want to have enough space for each one. Once all of the half-hexagons are sashed, it is time to press and cut.


Using the edge of the Half-Hexagon template. Line it up and cut each one. This will add a nice border to each half hexagon. Now for the fun part!


Have you ever tried to make a friendship braid? Not only in quilting, but embroidery thread bracelets too? When I was in third grade, and active in Girl Scouts® I was always making my friends friendship bracelets. We used to collect friendship bracelets, the more you hand, the more friends you had too! We were obsessed. Even back then, my friends would get jealous that I knew how to make them and they didn't? I guess that was before YouTube videos....and I had a couple older sisters that taught me everything I knew (back then). Except for pig-latin which they would use against me to talk about the boys at school. In hopes, that I wouldn't tell my parents! Haha. They looked sew cool! It has to be my all-time favorite pattern. As soon as I saw this tutorial, I already knew exactly what I wanted to make. It has been added recently and I'm thrilled about it! Thank You MSQC!

Ok, sew you want to grab six half-hexies to make one block. Make sure these six blocks are all mismatched and different colors. It makes for a more interesting quilt. Start by adding the side of a hexagon to the bottom of the other hexagon. * Watch the YouTube tutorial for a better understanding. Once you start, it becomes easier to add each one...creating this braid until you have added all six half hexagons. 


Now we are going to square-up our blocks. Ewww....not very exciting. Mine were squared to 12.5 x 12.5 inch blocks. Ta Da! You will have some scraps left over, don't worry!


You will need 12 blocks altogether. 4 rows of 3 columns. Make sure the iron is HOT - you are going to need to press these babies for awhile. Also, play around with the layout. Using your quilt wall or floor, work these blocks in different directions and patterns. You don't want the rows to look alike. Mix it UP!


Obviously you want to play around with all of the blocks until you are satisfied and ready for the next step. You will want to add sashing strips in between each block and along the bottom to add some dimension. Start with the first row of three, and work in rows until you are done. Then, sew each row together with sashing in between.

Eventually you will want to add an additional border, batting, and binding to this beauty. Check out my 'Recent Projects' page for updated picture when this is completed. Soon Hopefully!


Sew Pretty! Hope you enjoyed these pictures and preview of what's to come.
Thank You

LMK


Monday, February 22, 2016

Now Open

Come one, Come ALL!

I am happy to announce my new Etsy store, "OwlTellYouSew" is now OPEN! 
I am super excited to share with all of you what I have been working on.


This has been a very long time coming, and I couldn't be happier with the outcome (sew far). It has been all around exciting and super hectic at the same time. I recently started writing this blog in October, and trying to learn more about social media, advertising, followers, etc...It has been a challenge to say the least. After many long hours...now is now!

I would like to encourage all of those whooooo are reading to submit any feedback! I am still learning, and would appreciate any and all forms of advice. I have a game plan going forward, but I am going to need the support from friends and family! Wanna know how you can help?

-My GOALS-

1. Blogger Attention

My blog is fairly new, and sometimes I wonder if its worth it? Whoooo Cares? But then I remember how much I love to make and create things! I am seriously obsessed. By having this blog, allows me to share my creative spirit, and show those whoooo might not care, that its fun and easy! I have been inspired by many of those who have been doing the same thing for a long-ass time. What keeps them going? These people are amazing artists, mothers, quilters, athletes, foodies, wine-drinkers, whatever it is...they are really good at what they do. That being said...Do what you LOVE!


It would be my honor to be mentioned in some of these bloggers posts! They have a huge, loyal following and can keep their followers coming back for more. Wow. Below are a few links to my all-time favorite bloggers! Whoooooo knows, you might find something you like?

A Bee in My Bonnet 
3and3quarters
VintageGrey Handmade
Cluckclucksew
SeekateSew

2. Local Shops

The minute I launched my Etsy store, I thought items would be flying off the shelves! Haha, was I wrong! You need to put in the long hours, hard work, and personal face-to-face time and effort. As a business entrepreneur, I know how important it is to actually see, touch, hold, and try on these items. You don't always get what you want, or get what you see necessarily? It is difficult to express the LOVE in handmade items through pictures. It just isn't the same. Kinda like dating sites? Which brings me to my next goal. Providing local shops with my baby clothing. I have noticed that more pop-up stores are coming to my area that are encouraging handcrafted goods and homemade items from locals to sell. Yaaas! I can't wait. For the next few months, all of the crochet baby rompers will be sold locally. That seems like a dream come true...


3. Craft Shows & Farmers Markets

Has anyone ever tried to sell an item at a craft show or farmers market? I have heard great things about this, but never had any interest. Until now! 

How much does a booth cost? 
What are people looking for?
Does it have to be food? 
What should I expect? 

I went to the infamous "Eastern Market" for the first time recently and was completely thrown off by how many people and things were there. The entire place is crawling with local artists, farmers, food trucks, flowers, and sew much more! I actually spent all day looking for a cookie jar, and finally found the most adorable apple jar hiding in the corner on the very top shelf. Since it was my birthday I was able to talk them down and get a great deal. I think being able to meet people that have the same ideas and goals in mind would be very inspiring and motivating. I love people, and could talk to a wall if I had too! 


This has been such a learning experience for me. I really enjoy the challenge and can't wait to see what comes of all of this? I am definitely going to aspire at meeting these three goals in the next few months. Most importantly, my connection with people. I need all of the support and followers I can get; and with the help of my closest friends, family and community, I will show all of my love in my work.

Thank you for reading, and stick around for more exciting news to come!
XO

LMK


Monday, February 1, 2016

Coming soon!

Well the time has finally come! This year I am launching my first baby clothing line on Etsy. It has been a long time coming, and many people have been asking me when will you start selling your stuff? I have had my apprehensions about whether or not it would be worth it? It takes a lot of love and attention to make something...as well as time. By starting an Etsy store, I know that everyone whooooo makes a purchase will appreciate my hard work and effort. Thank You!

My baby clothing line will comprise of all cute, handmade items that are all different colors, patterns, and themes. Perfect for new moms, baby shower gifts, and little ones. The inspiration comes from my closest friends and family that are soon-to-be mothers! The baby showers, nursery themes and overall need for handmade items never stops...so why not share with the world my talents and see what happens. 

It is sew much fun to go upstairs into my little sewing dungeon and work. It isn't work if you love what you do, right?! Sometimes it's better than going out with friends on a Friday night, lol. I am excited to show you all what I have been working on, and encourage you to leave feedback. Positive vibes only, please!

This is what started it all...these precious little rompers are adorable! Have you ever seen anything like it before? 

I started crocheting awhile ago and stopped when it became overwhelming. My hands would cramp, I'd sit on the couch for hours, visits to the chiropractor were weekly. It was rough. I still loved every minute of it though. I took a break when I received my first sewing machine for my birthday. This took on a whole new obsession! I started buying fabrics, quilting blankets, sewing bags, pillows, paper-piecing, etc...

Which has led me to these vintage baby bloomers! Sew easy to make, and the outcome is just too cute. I found the pattern throughout the Internet and in books. There are many different patterns out there, so experiment until you are comfortable with what works for you. I have never used bias tape or elastic before, but this would be a good start into making clothing. I even added my own, handmade labels!!! 


Once I have an idea or goal, there is nothing stopping me. I immerse myself completely...almost as if I'm learning another language. Creating and implementing new concepts is in my blood! I can't help it. 


 Follow my Instagram account @owltellyousew to see more pictures of my personal life. The picture above was an attempt at good Etsy branding; trying to market myself as a company. It has received a lot of likes and comments so far on social media. This was the very first crochet romper in grape created, and will be available for purchase soon!! Woooohooooo 

I have been working hard on branding my Etsy store by creating banners, pages, and of course my new blog! This has been a learning experience to say the least. For those of you whoooooo say, "It's too much work", "I don't have any time", "I can't make anything", you're wrong! With today's use of technology it makes it fairly convenient to be an entrepreneur. There are apps, webinars, videos, and blogs out there that have some words of wisdom and excellent tips to follow on becoming successful. 


Additional items to go with my clothing line are simple accessories such as headbands and bandana bibs. These make the perfect pair in baby fashion.


This bandana bib is the perfect accessory for all drooling babies. They are made with 100% cotton and cotton flannel backing, and are super soft! Made with snaps for extra comfort. These bibs can be worn anytime! If you don't want to ruin that nice dress, feeding is messy, it's cold outside, baby is teething, whatever the reason! Don't worry if the bib gets dirty, just throw it in the washing machine and tumble low to dry. Done! Not to mention, it's reversible! And this modern-girl owl pattern is super adorbs! I love it, don't you?!


Don't forget about headbands! 

Headbands have been a huge hit this past year for kids. Felt flowers, leather clips, and unicrowns to name a few. After making a few nylon felt headbands in the past, I needed to correlate cotton fabric to match the bloomers. Knot headbands came up and are easy to customize. 


This is a matching pink posey headband to go with the bloomers! It is adjustable and fits most babies with 15-18" head diameters. These are made with elastic for the perfect fit! 


This was my attempt at what they call, a "flatlay." Don't worry, I will try to be more creative. Just getting the right lighting is hard enough! By the way, it took me almost an entire day to wrap that yarn ball. Just kidding, not that long...but it sure felt like it! It happens to be exactly 18.5" in diameter. Perfect! 

That is just a sneak peek as what's to come! I hope you love these items, and look forward to the beginning of a new chapter and being apart of my experience. I am planning on launching my Etsy store on Valentine's Day! It is called, OwlTellYouSew and I am happy to call it my own. Keep an eye out for the launch day! Thank you, thank you for stopping by and come back soon.

XO

LMK


Friday, January 22, 2016

Owl Tell You Soap!?

Wait, did I say soap? Whoooo said anything about soap? Yes, I did and I can't wait to show you how easy this project actually is...You should give it a try. Plus, it's better for you! My husband has super sensitive skin (as most of us do) and you never know what ingredients you're using everyday on your skin. *Did you know; 80% of those ingredients are absorbed into your blood stream upon use. Sounds gross, right? Well, I think I may have found a solution! This melt n' pour goats milk soap base is clean from harmful ingredients and you can make your very own scents. It's awesome, amazing and super simple. Let's get started.


This is what you need:

12 oz. - Goats Milk Soap Base
1 - Chamomile Lavender Tea bag
1 Tbsp. - Honey
1 Tbsp. - Ground Oatmeal
Silicone Soap Molds
Few drops of organic, Sweet Almond Oil


You can definitely get creative here with ingredients. It's all natural, so whatever floats your boat! Honey, oatmeal, lemon, coffee, coconut oil, olive oil, almonds, chai tea, poppy seeds, essential oils, etc...

I thought using tea was a genius idea! It adds scent as well as color. Looks really good aesthetically too. Love it! Woohoo doesn't have an entire jar of tea bags in their house? I want to try chai tea next. 

First, gather all of the ingredients and measure out the amount of goats milk soap base to be melted. I recommend at least 12 ounces. My cute little owl molds are teeny tiny, about 1.5 ounces each. You will want to use more soap base for larger molds. 


Make sure the soap is cut into even portions, that way it will melt evenly. You want to microwave the soap base in 30 second intervals, for about 1-2 minutes. Depending on the power of your microwave, until it becomes a liquid.

Next, you want to add the oatmeal, tea, honey and almond oil. Mix all of the ingredients together, and pour into the soap molds. Lay some parchment paper on your work surface for easy clean up! 


Let the molds cool completely before removing them. This takes at least 2 hours. Once the molds cool, just pop them out and get ready to use immediately! Oh, it's so sudsy, creamy and soft. The scent isn't too much, but just enough to be relaxing and leave a reminiscence on the skin. 

I have noticed a lot of other recipes out there that use lye and seem harmful to make? I didn't use any of that in this recipe, which is why this product gets two thumbs up in my book! Just melt n' pour...add whatever is in the pantry...and enjoy! 

If you want to add color you can purchase soap colorant, or use organic beet juice. If you add Rose oil and made it red or pink, it would make a pretty soap that could be gifted, or indulged. I might have to try that next time! If you have any Rose oil let me know, it's my all time Favorite scent, in the whole world. I hope you enjoyed reading this post.


Thanks,

LK


Footnote *  The majority of mainstream body care products contain a cocktail of carcinogenic chemicals, allergens, and irritants. To eliminate a lot of toxic chemicals, preservatives, and fragrances that are harmful to our bodies, choose certified organic and natural skin care products. It is important to read labels and become educated about what ingredients to avoid when selecting body care products. A good motto to go by is if you can’t pronounce it or have only seen it in chemistry class, don’t use it!


Thursday, January 14, 2016

DIY Bird Feeder

Winter is here! And in Michigan, it gets super cold and blustery...I always wonder, "what about the birds?" Poor little babies must be starving!


I work from home with my cat Lola May, and she loves bird-watching as much as I do. Well, actually she likes squirrel watching more! Either way, it gives us both something to look at while we work. I wish I would have found this cute bird feeder idea sooner! They would have made cute Christmas gifts and it wasn't too cold over the holidays this year. I was freezing my feathers off in the garage, because this project is a MESS and I wanted to stay away from our clean kitchen. 

Here is what you need:

3/4 Cups of Flour
Gelatin Packet
3 Tbsp. of Corn Syrup
1/2 Cup of Hot Water
4 Cups of Bird Seed
Parchment Paper
Non-Stick Cooking Spray
Cookie Cutters or Muffin Tin
Straw, dowel, or chopstick
Twine

Step 1-
Mix hot water, flour, gelatin and corn syrup together to make a smooth paste.

Step 2-
Add the bird seed and start mixing! This stuff sticks to everything, so don't forget the non-stick cooking spray when molding the paste into your cookie cutters. 

Step 3-
Lay the parchment paper on a cookie sheet and spray your cookie cutters or molds with non-stick spray. Grab two tablespoons of bird seed mixture and smoosh the paste into the molds. Pack the mixture down. Wear gloves, or use the back of a spoon. 

Using a straw or chopstick, poke a hole into the molds so you can hang them in the trees later! Isn't this exciting? Just imagine how happy the little baby birds will be! 

Step 4-
Let them dry for at least a couple hours at room temperature. I left mine in the freezing garage overnight before popping them out of the molds. 

Step 5-
Grab some twine or string to loop through each hole. Pick a tree with a close view...Watch and wait for your happy little birds to enjoy!


What wild birds have you seen so far?
I love bird-watching, particularly goldfinches, they are my favorite!

- Goldfinches
- Nuthatch
- Red-tailed Hawks
- Cardinals
- Downy woodpecker
- Dark-eyed Junco
- Tufted Titmouse
- Northern Flicker
- Hairy woodpecker
- Chickadee 

Just to name a few...The birds love wild bird food; you could even add some fruit or peanut butter to your mix. Whatever you want! You can look online for different recipes and tutorials. They are fun to make during these cold winter months when you're stuck inside. Save it for the next snow day!


Thanks,

Laura

Monday, January 11, 2016

Coaster Craze

Coasters are everywhere! They make a perfect house-warming gift and everyone loves them. Whooooo wouldn't?


I received a few of these coasters recently and love using them when we have guests over. On NYE, we were using our French wine glasses and kept getting them confused with each others' glasses. Mine usually have a lipstick mark and is filled with Chardonnay, but why not make it easier for everyone! Problem solved. Slip these little guys under the bottom, and you have the perfect glass identifier! How Cool!?

I heard they were very simple to make and super fast! You can whip these up in minutes. Stuff like that always amazes me. So, I googled folded coasters and this tutorial popped up. She does such a good job explaining the steps (not like it's hard) and has helpful pictures too.

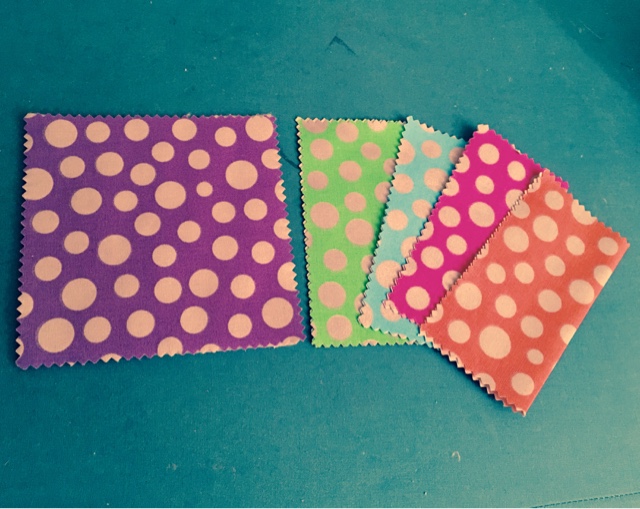
I found this charm pack that was on clearance for $3.00. I used a coupon and it ended up being half-off. Sew I bought two! They each come with 30, 5x5 inch squares. This will make exactly six coasters. Perfect! Let's get started.


Grab 5 different charms. One charm square will be your backing, and the other four will make the top. You can use batting in between to make it thicker, only if you want. 

First, lay a piece of batting down, with the charm square right side up on top (purple). This will be the back of the coaster. 

Fold the other charm squares in half and press. Lay the first folded charm along the side. (green)

Make sure the salvage edge is along the outside, keep the folded edge on the inside. Lay the next half on the other edge. (blue)


Green, blue, pink, orange! When you get to the fourth charm, you want to tuck it under the first (green) fold. It should end up showing all four colors...in the order you placed them. 


Pin or use clover clips to hold in place. These little guys love to slide around! Once it is pinned in place, take it to the sewing machine and sew around the edge using a 1/4-1/2 inch seam allowance. 


Trim the corners and clean up the edges. Now is the fun part!! Flip this little guy inside-out. I use a crochet hook to push out the corners. Then, use the iron for a final press. 


Front and back, all finished in bright colors and fun polka dots! Ta-Da! Doesn't that look great? I know a few people that would love this for their bar, outdoor patio, kitchen table, boat, etc...

Like I said before, 30 of these charm squares make exactly six coasters. The best part about buying pre-cuts is that they already match, and are cut to perfect 5x5 squares. Boom! Whooooo can stop at making just six? 


Before I started making these, I like to look online at pictures of what everyone else has made. It usually sparks inspiration and makes me want to do it even MORE! I'm addicted, what can I say? I happened to find this picture on Instagram. 

What does it make you want to do?


This set of coasters is sew awesome! I love the rainbow, the circle of colors, it's very mesmerizing. Wouldn't those be perfect next to the pool on a hot summer day? Listening to gangster rap...I hope! Drinking Chardonnay. Yaaaas! 

So next time you're at the fabric store, grab some charm squares and get to your sewing machine! You can make these in a variety of colors, themes, and even shapes. I heard you can use hexagon precuts to make hexagon coasters. I love hexagons! I will have to try those next time, till then...Check out this YouTube video "How to Do Hexagon Coasters"

* I gifted this set of coasters to our good friends mom, Mrs. G! One summer day, we took their boat out, and we're having a couple glasses of chardonnay with these adorable wine glasses she bought from Target...I was apprehensive in the first place trusting me with my wild mantis arms. Long story short, my mantis arms knocked the wine glass off the boat and into the lake! We circled around looking for it (it was supposed to float), but couldn't find it anywhere! I felt horrible, and haven't been invited back since! Haha...I know she will love them, and they even match her patio furniture. :)


Thanks for stopping by,

Laura


Wednesday, January 6, 2016

Floral Felt Crowns

Now that it's a New Year and the weather is changing...I have had more time to relax and organize my priorities. I love a new chapter! This is going to be another wonderful year, I just know it.


I've decided to take a break from sewing and quilting to try new things! You have to start somewhere...Which has led me to making pretty felt flower headbands! I can't stop, they are just too cute. This doesn't mean that I have stopped sewing altogether, NEVER! I am always thinking of new business ideas and things to make. It's a never-ending invention wheel in my brain. It can be overwhelming at times, but by staying focused and organized, I can only imagine what's to come....it's exciting!

After looking around, I decided I must try one of these nylon headbands. I already have a pair of nude nylons (never worn, of course) and felt. Whoooo wears nude nylons these days BTW??

So grab some of your favorite felt colors and plug the glue gun in now! The felt is pretty inexpensive. You can pick each piece for $0.39 or get a bundle for $3.99. Let's give this a try!


Step 1-
Use a template of some sort to make a nice circle of felt. I traced a CD, but you can use ball jars, coffee mugs, candles, solo cups...anything! As long as it's at least 3" wide.


Step 2 -
Grab a sharp pair of scissors! Go around the circle in a fancy-puffy way. Or smooth curves. If you choose not to do any fancy cuts, it will look tighter and smaller. Cut a spiral around and around until your circle becomes three dimensional. You will want at least 1/2 inch space between the sides. You will be rolling the ends up to make them blossom.


Step 3 -
Grab the glue gun. As you roll, glue along the bottom edge. Keep going until you get to the end. Watch your thumbs, I kept burning myself while I was rollin. Watch out! Another suggestion would be to purchase a low-heat glue gun. They do exist!


Step 4 -
While the felt flowers are drying. Grab some green felt to make a few leaves to go with your flowers. I used pinking sheers, or you can cut slits on the sides to make it look leafy.


Step 5 -
Cut a pair of nylons into 1 inch bands. Then, glue the felt flowers to the nylon...add a small piece of felt backing to add support and comfort. And that's it! If you don't have nylons, you could also use elastic or crochet headbands. The best part about using nylons, is because one size fits all! You don't have to worry whether it's a newborn baby or adult. I can fit it around my big head without any problems! ;) love it! 


Felt is really addicting and fun! You can cut out different shapes, add embroidery and play with an assortment of coloooors! I used my accuquilt to cut out a bunch of hearts in felt. I added a few special touches on each one by hand sewing! Then, I blanket stitched around the edge and stuffed them to make little heart pillows. I used one of the stuffed hearts to hold a floral headband in place. I plan on gifting it to my niece! 


You can use felt for other things other than headbands, such as:

- gift wrapping
- garland 
- wreaths
- stuffed animals
- baby mobiles
- hair clips
- face masks
- ornaments (check out my advent calendar) 
- birthday crowns
- pillows
- costumes
- poker table
- quilt wall

Whatever you want, really! Next time you are at the craft store, pick up some felt and give it a try. 
If you have any comments or questions, email me at owltellyousew@gmail.com

Do you have any new year's resolutions? Projects that you're holding off? Diet Plans? No more waiting...now is the time to try something new, step outside of your comfort zone, you never know what will come of it...unless you TRY! 

Happy New Year- thanks for stopping by! 
Xo

Laura